SharePoint Permissions Active Directory vs SharePoint Groups
Posted: January 25, 2013 Filed under: Permissions, SharePoint | Tags: Active Directory, Permission, Security 4 Comments What should we use to manage SharePoint Permissions: Secure Active Directory (AD) Groups or SharePoint Groups?
As with everything in SharePoint the answer is, “It depends.” Most people end up using both AD Groups and SharePoint Groups to manage permisisons.
Before we discuss the pros and cons of both AD groups and SharePoint groups, there are a couple things we need to keep in mind.
Keep in Mind
- A distribution list is NOT an AD Group
- An AD Group MAY have a distribution list
- Only Secure AD Groups can be used
|
Active Directory Groups |
|
|
Pros |
Cons |
| Managed by IT The IT Department creates and manages the groups. The Site Collection Administrator and/or Site Owner do not need to add and remove users from AD Groups. |
Can’t see users SharePoint can’t open AD Groups. This makes troubleshooting permission issues a challenge. If the AD Group has a distribution list, put the distribution list in the To: line of an email and expand to see the users. |
| May contain multiple groups (nested) If a department is made up of several teams, the department AD Group usually contains the team AD Groups. This makes managing users easier. |
Can’t use with Person/Group column SharePoint can’t open AD Groups. When using a Person/Group column, under Additional Column Settings we can allow people to select from all users or only users in a selected Group. |
| Great for large groups Adding smaller AD Groups to create a large AD Group makes managing users easier. |
Sometimes not kept up to date IT manages Active Directory. Sometimes there is a delay in communicating changes to IT. Active Directory usually syncs with SharePoint overnight. |
|
SharePoint Groups |
|
|
Pros |
Cons |
| Use for Person/Group column When using a Person/Group column, under Additional Column Settings we can allow people to select from all users or only users in a selected Group. If the SharePoint Group contains an AD Group, there will be no users from which to select. |
Adding and removing users The Site Collection Administrator and/or Site Owner to add and remove users from SharePoint Groups. When a user changes teams, departments, roles and/or companies the Site Collection Administrator and/or Site Owner must move the user to the appropriate SharePoint Group. |
| See users in group Troubleshooting permissions issues is easier when you can see what users are in which groups. You can see individual users in SharePoint Groups, but you cannot see users in AD Groups within SharePoint. |
Can’t nest SharePoint Groups SharePoint does not allow us to add SharePoint Groups to a SharePoint Group. Example: We have a SharePoint Group for each department; IT, HR, ect. We want to create a SharePoint Group named All Departments. We would need to add individual users to the All Departments Group as we cannot add the IT SharePoint Group and HR SharePoint Group to the All Departments SharePoint Group. |
| More flexibility The Site Collection Administrator and/or Site Owner to add and remove users from SharePoint Groups. This allows us to create groups to fit any need. |
|
What other pros and cons have you run into? Leave a comment and they will be tested and added to the lists above.
If you need an overview of SharePoint Permisisons check out SharePoint Permissions So Easy Even a Caveman Can Do It.
Love My Traveling Secondary Monitor
Posted: January 8, 2013 Filed under: Travel | Tags: Monitor 5 Comments I LOVE having two monitors while I am working. It makes it easier to compare documents, write step-by-step documentation, and keep an eye on TweetDeck.
My first travel monitor broke after a couple short months. Although it was very inexpensive I did not choose to purchase it a second time. If you’d like to see the first monitor, check out my old blog post Dual Monitors on the Road.
I decided, after much research, to kick in an extra $100 (total under $200) and go with the Lenovo ThinkVision.
- Weighs about the same as my iPad (3) and the screen is just a little wider than my laptop screen.
- No need for an extra outlet. This thing is powered through the USB (the only hook-up) port on your laptop.
- I’ve actually hooked up a VGA cable monitor and the ThinkVision; Hello three monitors without changing cards.
- It comes with an easy-to-slide-on cover to protect the screen. Wish the first one had that feature.
- You can watch webinars and screencasts without pixelation or lag time. Don’t think I’d try video games.
This monitor has been in constant use since November 2010. I’m talking five to seven days a week. It ROCKS.
UPDATE 10/12/15 – Still using the monitor, though not as much as I used to since taking a full-time job. Still works. Still recommend it.
UPDATE 8/8/2022 – Just used it last week while working from a friend’s house. Really made a huge difference in productivity.
Upload Documents in SharePoint 2013
Posted: December 31, 2012 Filed under: SharePoint | Tags: 2013 6 CommentsThere are at least two ways to upload documents to a SharePoint 2013 library.
- Old School – Click on Documents tab and in the New Group, select Upload. Just like in 2007 and 2010.
- New School – Just drag and drop the document into the library. No need to open in Explorer View, get a cup of coffee while you wait for it to open, and then drag and drop files.
Click on the video below to check it out.
SharePoint Permissions So Easy a Caveman Can Do It
Posted: December 28, 2012 Filed under: Permissions, SharePoint | Tags: Permission, Security 9 Comments These drawings, found in a cave in Redmond, WA, date back to early 2001. The pictographs have stumped archeologists throughout the ages, until now.
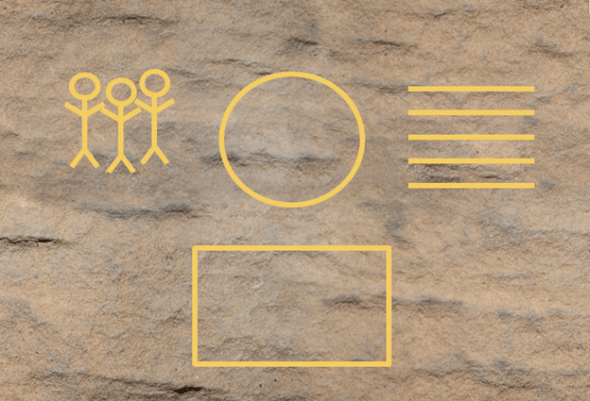
Recent discoveries by a SharePoint addict reveal the true meaning of these images.
“It looks like the four building blocks of SharePoint permissions.” Take a look at the cave drawing again, this time with annotation.

But how do SharePoint Permissions work?
Here are the basic steps:
- Add users to the SharePoint group
- Give the group a permission level
- Grant the group access to somewhere
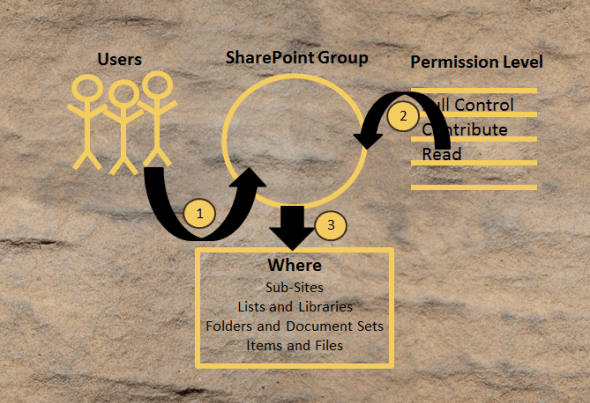
Of course if you are not satisfied with the permission levels or SharePoint groups that are available, given the correct rights, you can create your own groups and permission levels.
Although it is not considered a Best Practice, you could also give permissions directly to a user.
- Give the user a permission level
- Grant the user access to somewhere

Some of the drawings show another figure. This additional figure depicts secure Active Directory (AD) groups.
- Add AD groups to the SharePoint group
- Give the group a permission level
- Grant the group access to somewhere
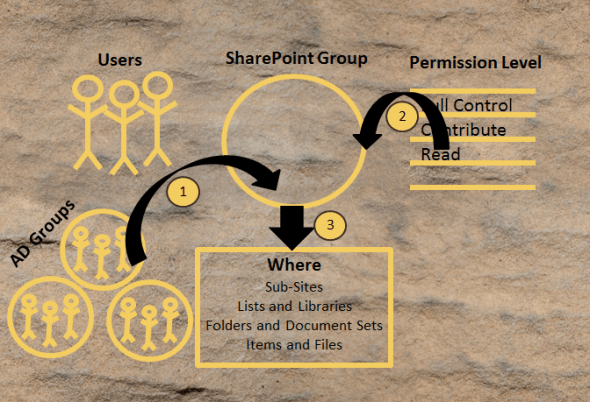
Further interpretation of the drawings revealed another option
- Give the AD group a permission level
- Grant the AD group access to somewhere

Some archeologists were stunned that there was no pictograph for audiences, but then someone pointed out that SharePoint audiences are not part of permissions or security. SharePoint audiences are just a way to reduce noise on a page.
In our next session we will discuss the pros and cons using AD Groups and Users to manage SharePoint Permissions.

View and download the entire deck here.
What the Heck Is Metadata?
Posted: December 13, 2012 Filed under: Metadata, What is... | Tags: Metadata 9 CommentsWhen people define metadata as “Data about data” I want to poke them in the eye. That definition doesn’t help anyone understand what metadata really is.
If you want to help your users understand what metadata is try this:
Show them a photo of my dog Stella…

Ask your users to describe the photo.
You’ll start hearing things like:
- Dog
- Black and White
- Little
- Cute
- Outside
- Autumn
- Boston Terrier
Your users just defined metadata for this picture.
So in a SharePoint Picture Library you could add the following columns:
|
Column Name |
Choices |
Column Notes |
|
Animal |
Cat |
|
|
Color |
Black White Orange Green Brown |
Use check boxes to allow multiple selections |
|
Location |
Indoors |
|
|
Season |
Winter |
So back to the original question, “What the heck is metadata?” Metadata is how you describe something.
Consider a contract. I might call it the Anderson Contract for a $350,000 house build. That’s 3 pieces of metadata right there; Anderson, $350,000, House Build.
Metadata is the description of an item.
Content Types 101: The Cartoon
Posted: December 11, 2012 Filed under: Metadata, SharePoint | Tags: Content Types 2 Comments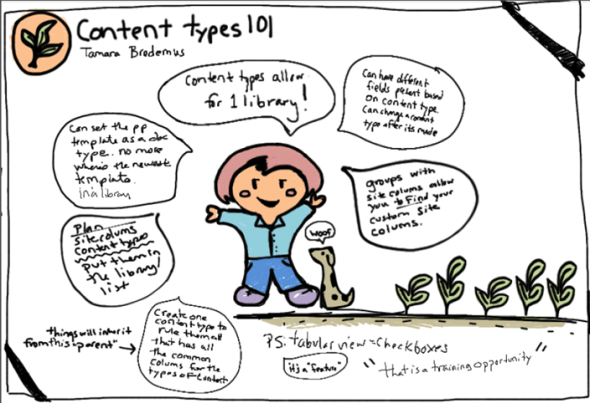
Content types in a nutshell:
- Plan your Content Types.
- Create Site Columns on the Parent Site if possible.
- Create a Parent Content Type that includes Site Columns all child Content Types will have in common for ease of updating.
- Create your SharePoint Content Types on the Parent Site so you can use them on sub-sites.
- Add Site Columns to your Content Types.
- Add your Content Types to your List or Library.
Want to see the deck including demos? Content Types 101: Easier Than the Theory of Relativity
Special thanks to Rae of Words of Rae: raerei.com/blog for this lovely cartoon.
